Memorial Day is past. Summer is almost here.
Memorial Day is past. Summer is almost here.
Today there will be two posts. Each post will have a question. I’m asking this question first, because the other one tends to distract people.
Since you last heard from me, we took an impromptu trip to Atlanta. Michael had to go up for a Thing and Ellie had packed the stroller so I could push her to visit Gran and Pop. I figured it would be faster (and less strenuous) if we all just rode in the Jeep together. The extra knitting time to finally finish the first of the New Guys was a bonus.

Long Tall Bunny takes a nap.
He’s 16″ tall in bulky yarn and stuffed to be floppy. Knit in the round with minimal seaming, the only tricky bit might be the grafting at the top of the arms and legs. His ears have short rows, but there is nothing to them if you trust me blindly and do exactly what the written directions say.

Think he’s cute? Wait until you see the cat.
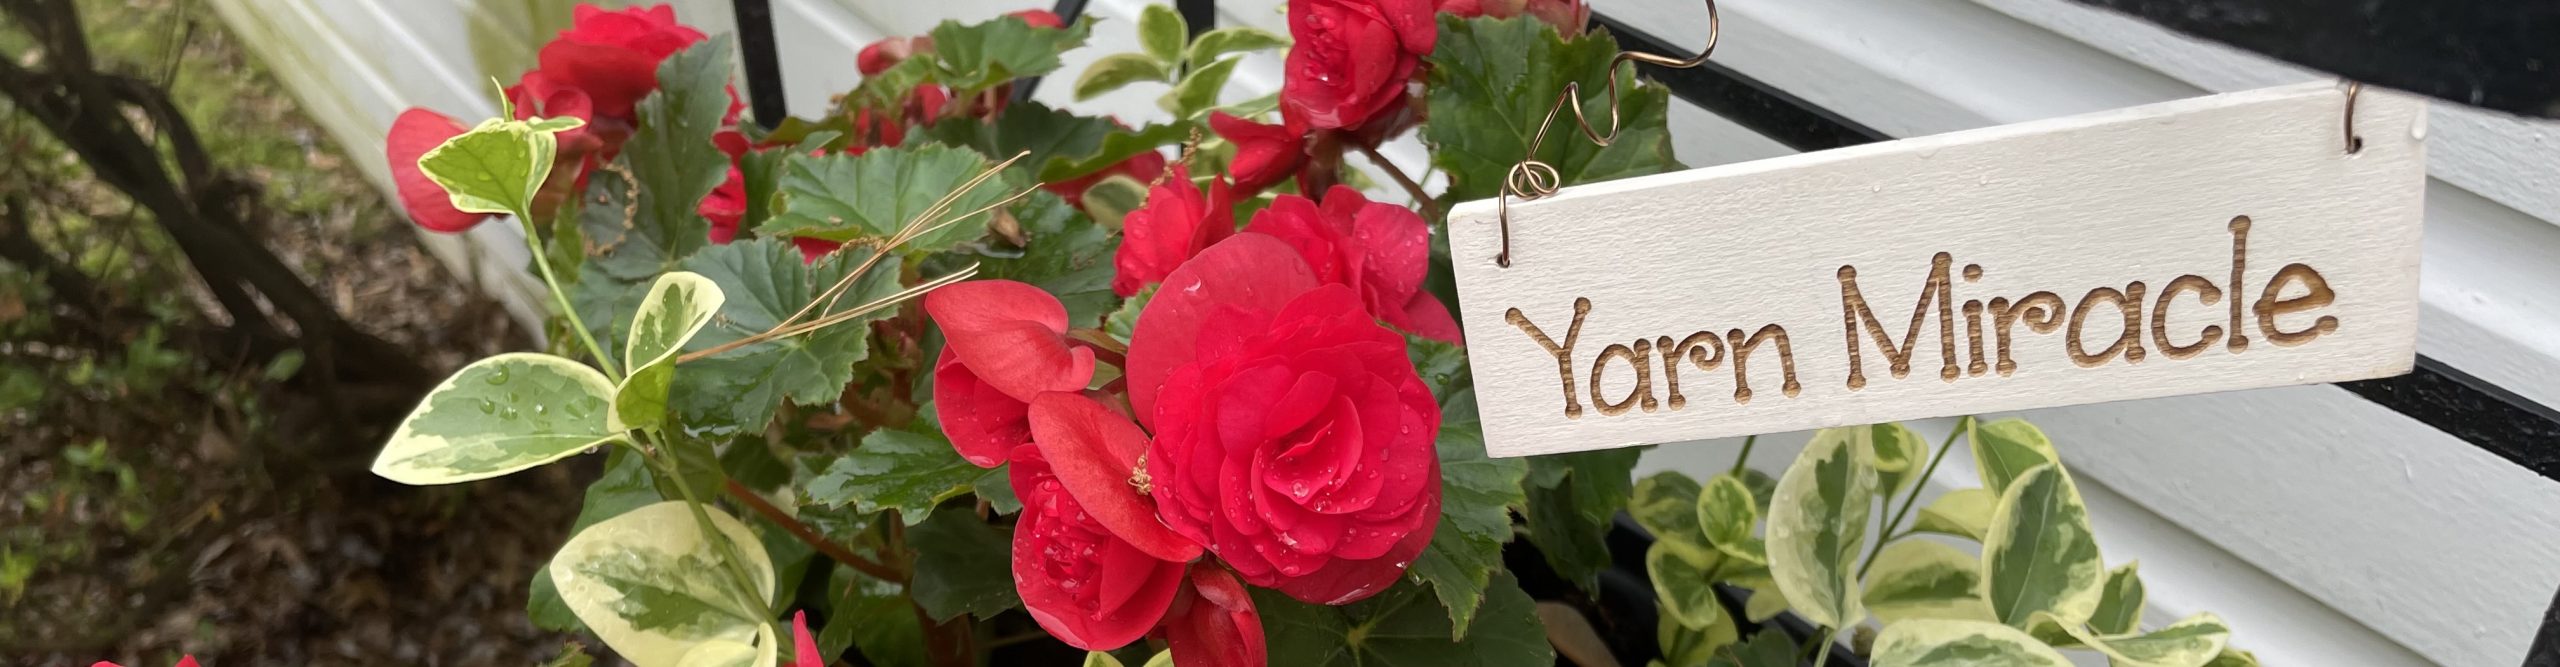
Who’s up for a test knit? The pattern should be ready for you on Friday. I would LOVE to have all notes in by June 20 – Rabbit probably takes between 6-7 hours to knit. You’ll need about 170 yards of a bulky yarn (Prototype Rabbits are in Sprout) to make one like the picture. But if you want to try him out in worsted, that would be great! I’d like to know how big he turns out. Test knitters who complete the project and send me notes in a timely fashion will receive a copy of the finished pattern and (since this guy is more work than my usual) a modest thank you package for your time.
I’ll need five knitters. As always, Faithful Readers, y’all get the first grab.
**Test Knitter Slots are filled! If you didn’t get a chance to test the Rabbit, there are more critters in the Yarn Miracle pattern queue!**

Itty Bitty Vultures will be in the shop later today. Probably.
I did so want to have a finished prototype to show you this week! But I’m not quite there yet.
But I can tell you that Susanna is our lollipop recipient!
And I can tell you that the Middle Eastern Cast on wins the Crazy Easy toe-up cast on award (thanks for the tip, Beth).
I can also tell you that while I have decided to recommend a toe-up cast on in the pattern, I am going to write the directions for the regular way with a seam. It isn’t critical to the pattern so I don’t want anyone to read the directions, panic, and then not try the toy. My Favorite Trick remains awesome, but not worth the explanation if a seam will do.
In other words: I wussed out.
All that wasn’t for nothing, the M.E.C.O. is going to be invaluable for a future pattern – and I’m not even going to tell people that’s what they are doing until it’s all over. I’m so tricky.
I have SO MANY IDEAS. And not enough time for them.
And all of these. (Since I’m wishing.)
I’ll take one of each in worsted please.
I’ve been struggling a little searching for yarns for the new batch of patterns I’m working on. I’d like to feature all the animals in two yarns (worsted and bulky) per pattern. I’d also like to highlight yarns from ‘independent’ spinners as well as a more commercially available yarns. Can you think of a better reason to try new yarns? This is harder than you would think – especially since I am mindful of the living conditions of the animals (and worms) that produce the fiber I use.
I came across this post this morning and thought to share it. She has a lengthy list of happy farms and spinners at the bottom that is going to be invaluable.
Also, if anybody has a “kind fiber” tip or if you spin or dye fiber and you know where it came from, share away!
I know I said I would have three techniques for you to try, but I only have two. I’ve opted not to use my New Idea (cast on 20, divide them alternating between two needles, go on from there) because the stitches are loose unless you twist them as you knit them. The twisted stitches look interesting, and I might use this idea for something else, but it won’t work here.
I’ve got a toe-up cast on and my favorite knitting trick for you to try. If you want to participate, please try both and then leave a comment that tells me:
a) Which written instructions are the easiest to follow.
b) Which method is the easiest to accomplish.
c) Which technique was more fun.
d) Which you think is better-looking or anything else you discovered or thought of that might be helpful.
To participate, you’ll need a set of four double pointed needles and some scrap yarn.
I estimate that this little exercise will take you less than 20 minutes. If you spend much more time than that figuring these out, I need to try something different. Every opinion is valuable and I want to hear them all! However, if you’ve never tried either of these techniques before, yay! I am especially interested in fresh eyes and fingers. I’m not sure why I am reluctant to tell you what toy part we’re working on, but I am going to go with my gut here and keep it a secret.
Everyone who leaves a participating comment will be entered to win a drawing for my favorite hands-free (thus knitting-friendly) treats:
One dozen lollipops from This Charming Candy!
You pick the flavor, I’ll place the order and have them sent straight to your door or P.O. Box. I strongly recommend the salted caramel, but no pressure. Make sure you leave a valid email with your comment so I can get in touch with you!
Are you ready to get started? Let’s begin with a cast-on commonly used by toe-up sock knitters. It’s not Judy’s Magic Cast-On. While this one was really clever and looked good, it took me way too long to ‘get’. Completely worth it if I planned to make several pairs of toe-up socks, but not for this project. I got the Figure 8 on the first try so that’s what we’re testing.
Test Piece One: Figure 8 Cast-On on DPNs
Grab yourself a couple double pointed needles and hold them side-by-side in your left hand. I found it helpful to tie the tail of the yarn to one needle to give you an anchor to start with. If you choose to do this, count that as one of your stitches.

Pretend that is tied to just one needle.
Begin to wind your yarn around the two needles in a Figure 8.

Wrap up around the top needle…

…between the needles and down around the bottom one.
Keep going until you have 10 loops around each needle. If you spread out the stitches, they should alternate like footprints.

Check to make sure that the yarn is wrapped back and forth between the needles.
Grab another double pointed needle and knit all the stitches on Needle 1. Note: One of these needles will have the stitches on ‘backwards.’ When you identify that needle, just be sure to knit those stitches through the back loop. I haven’t done enough research to figure out if this is the second needle every time or if it depends on which needle you start with. If you’ve got some insight, please share?

My first needle was right.
Knit the stitches on Needle 2.

These were backwards for me.
I found that dividing the stitches was easier if I knit another round with the stitches on two needles. Please tell me if your mileage varies.
Knit the first 6 stitches from Needle 1. With a fresh needle, knit the last 4 stitches from Needle 1 and continue across the gap (turn the corner) knitting the first 4 stitches from Needle 2 onto the same needle. With a fresh needle, knit the last six stitches from Needle 2. Your stitches will now be divided onto three double pointed needles as 6-8-6. Continue to work in the round as expected. Rounds begin and on the side.

Really blurry, but you can see how the flat end looks.
To finish the sample piece, knit 4 rounds evenly. Break the yarn and run the tail through the live stitches so they don’t unravel. There is no need to draw them up or secure the tail.
Test Piece Two: Emily’s Favorite Trick for a Flat Bottom
Using two double pointed needles as straight needles, cast on 20 stitches.

With me so far?
Next: *K1, S1 repeat from * to end of row.
Repeat this row seven more times.

Looks like it is wrong side out? That’s because it is wrong side out.
Now be brave. Take your piece.

Deep breath…
Pull out the needle. Don’t panic. You’ve created a little pocket with all that slipping and knitting. Gently pull the sides apart to open it up.

If you’ve done it right, it will open right up.
Now carefully slide one double pointed needle through the 10 stitches on the top edge of the pocket.

Just scoop them all back up.
And then do the same thing with another double pointed needle and the 10 stitches opposite row.

You’ll feel better once all the stitches are back on the needles.
Now flip the piece inside out so that the smooth side of the stockinette is on the outside.

Surprise!
To divide the stitches onto three DPNs: Knit six stitches. With a fresh needle, knit the last 4 stitches from Needle 1 and continue across the gap (turn the corner) knitting the first 4 stitches from Needle 2 onto the same needle. With a fresh needle, knit the last six stitches from Needle 2. Your stitches will now be divided onto three double pointed needles as 6-8-6. Continue to work in the round as expected. Rounds begin and on the side.

There you go!
It is very likely that your gauge will change from the *K1, S1* portion of the knitting to when you switch to stockinette in the round. That is just fine for my purposes and might be preferable! To finish the sample piece, knit 1 round evenly. Break the yarn and run the tail through the live stitches so they don’t unravel. There is no need to draw them up or secure the tail.
You’re all finished! I’ll leave comments on this post open through Friday evening. If you’ve got free time like I’ve got free time, it will take you that long to get around to it.
Thanks very much for your time and patience!
WAIT! Beth suggested the Middle Eastern Cast-On! It’s easy peasy and the stitches aren’t ever backwards! If you’ve got another minute, would you go take a look?
The cast on contest post is taking a really long time to write. Have a look at my vegetables while you wait. And the uncut grass.

The tomatoes, peppers and squash are my picks. The corn is Ellie’s.*
The welded wire fencing is an Armadillo Invasion Preventative Measure. He’s dug up all the zucchini once already.
*It’s worth mentioning that Ellie does not eat corn.
Happy Work Week! (I missed out on Happy Mother’s Day and Have a Wonderful Weekend. And I didn’t take a single picture.)
I’m getting ready to give Judy’s Magic Cast On a go! I’ve got the Figure Eight open in a tab so I can explore all the suggested options. I am cast-on disabled. Anything that requires elaborate yarn wrapping or intense finger dexterity causes me to break out in hives. Thus, my default setting is a knit cast on. (Seriously, is there anything easier?) So. We’ll see.
I woke up with another idea for how to get this done. It’s so easy I’m not sure why it hasn’t been done before. There might be a fatal flaw that I haven’t considered.
Knitters (of toe-up socks and not), please stand by. There will be a Taste Test with a Participation Drawing in a bit. (Michael has to get up and take some pictures to go with my instructions.)
Today, you will all be Test Knitters!
Or maybe tomorrow, I have to see what Ellie’s plans are.
Any toe-up sock knitters out there?

I’m working on something new. (it’s not a sock)
I’ve got two related questions that I hope y’all can help me with:
Is there a toe-up cast on (besides provisional) that doesn’t require circular needles?
What do you think is the easiest (and easiest to explain) toe-up cast on?
I’ve got a way to do what I need to do, but I think that some kind of closed cast-on would be a much more elegant way to do it. The trick is that I don’t want to require people to have a second set of needles for these toys and I don’t want to force people to wrap their heads around a complex technique that takes a page to explain and might scare people away.
Toy knitting should be fun! Toy knitting should not make you cry and tear your hair.
Any ideas?