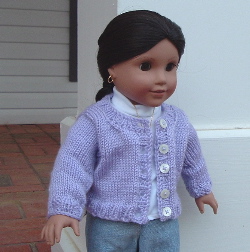
Boxy Cardigan for 18" Dolls
 This is an adaptation of a cardigan by a
woman named Arlene in Toronto. It was designed for an Emily doll who
seems to be thinner than some of the other 18" dolls on the market. I
began adapting it to fit and pretty soon the only things that remained
the same were the number of stitches cast on for the back and the button
hole spacing. I've provided my adapted pattern here for those of you
who have an aversion to math.
This is an adaptation of a cardigan by a
woman named Arlene in Toronto. It was designed for an Emily doll who
seems to be thinner than some of the other 18" dolls on the market. I
began adapting it to fit and pretty soon the only things that remained
the same were the number of stitches cast on for the back and the button
hole spacing. I've provided my adapted pattern here for those of you
who have an aversion to math.
materials
- Around 300 yards of sport weight yarn. I've used Red Heart's Baby
Soft because of it's availability (every Wal-Mart in America carries
it).
- One pair US #3 straight needles (or size to obtain gauge). One more
#2 or #3 needle for
three needle bind off.
- 5 buttons, I used 7/16".
- Stitch holders, at least three. Giant safety pins work well for
this.
gauge
6 stitches to one inch in stockinette.
back
Cast on 38 stitches.
K2, P2 ribbing for 5 rows.
Purl the next row, increasing as follows:
P1, M1, P12, M1, P12, M1, P12, M1, P1 (42 stitches)
Work evenly in stockinette until piece is 3" from the beginning,
ending with a wrong side row.
To shape armholes, bind off 4 stitches at the beginning of the next
two rows.
Work evenly on remaining 34 sts until piece measures 5" from
beginning, ending on a wrong side row.
To shape neck, K13, place next 8 stitches on a holder after knitting
them, K to end. Working each side seperately, at the next neck edge,
bind off 3 stitches. Decrease 1 stitch each row three times (I like to
work my decreases one stitch in from the edge). Work until piece is 6
inches from beginning and put remaining 7 stitches on a holder. Reverse
shaping to work the other side.
left front
Cast on 19 stitches.
Work 5 rows of ribbing as follows:
Row 1: K2,P2 across row, ending with K3.
Row 2: K1(P2,K2)
The knit selvage stitches are on the button band edges of the piece.
Purl the next row, increasing one stitch on the arm hole edge.
Work evenly on these 20 stitches until piece measures 3 inches from
the beginning, ending with a right side row.
Bind off 4 stitches. Work evenly on remaining stitches until piece
measures 4 1/2 inches from the beginning. End with a Wrong side row.
For neck, bind off 4 stitches work to end of row. Decrease one
stitch at neck edge every row 5 times (7 stitches).
Work evenly until piece measures 6 inches from beginning.
Attach front shoulder stitches to back shoulder stitches using the three
needle bind off method.
right front
Work as for left front reversing all shaping and ribbing.
sleeves
With right side facing, pick up and knit 28 stitches along one
armhole (in between the bound off stitches, be sure to pick one up in
each corner).
Work evenly in stockinette until sleeve reaches 4 1/2 inches from
picked up edge ending with a wrong side row.
Decrease 8 stitches evenly across the next row:
K2 (k2tog, K1)* end K2
Work 5 rows of K2, P2 ribbing.
Bind off.
Repeat for other sleeve
front bands
Left Front: Starting at the top, with right side facing,
pick up and knit 24 stitches. Beginning with purls, rib (P2, K2) for
4 rows. Bind off.
Right Front: Starting at the bottom, with right side facing, pick up
and knit 24 stitches. Beginning with knits, rib one row (K2, P2).
Next row: Rib 2 (bind off 1, rib 4, bind off 1, rib 5) 2 times.
Next row: Rib in pattern, placing a YO at each bound off space.
Next row: Rib evenly.
Bind off.
neck band
With right side facing, pick up and knit 50 stitches along neck edge
and top of front bands as follows:
13 to shoulder, 8 to holder, 8 from holder, 8 to shoulder, 13 to end.
Rib (P2, K2) one row beginning with purls.
Next row: K2, bind off one, rib to end.
Next row: Rib, placing a YO over the bound off stitch.
Next row: Rib.
Bind off.
finishing
Seam sides and sleeves, weaving in all loose ends. Block if you
think it needs it. Attach buttons to correspond with button holes.
note: If you want to make this as a cat sweater, I reccommend adding
at least 6 stitches to the back (you can just put the additional
stitches on the neck holder and rib them into the neck band) and
legnthen the sleeves half an inch to an inch. You should be able to
button a medium sized kitty up with these changes.
Pattern adapted by Emily Ivey (2005) from Molly's
Cardigan by Arlene in Toronto. Don't sell this.