Tag Archives: craft

Hooking

Our Museum has a Hooked Rug exhibition up right now and offered a rug hooking class taught by Anne Norvell to go with it.

Ellie and I were completely on board with that. The class was to make a little pumpkin rug – just big enough to get the feel for what might be a new hobby.

Getting Started.

She kept wanting to swap work with me since she preferred to fill in an area than make the outlines. She filled in all my pumpkin bits after I made the lines, and I made the pumpkin lines on her piece.

I worked some more on mine yesterday afternoon.

It’s another one of those meditative arts where you can find your zen. Gran-mother and Great Gran both hooked rugs at some point – I can only think of one that is still around. I’d like to make a rug-sized rug myself, but when I consider that my other massive project, the CounterPain, has been stalled since first grade…

I should probably finish that before I start another massive project. Probably.

Our Best Play Dough

I’ve made a lot of play dough in my time. Enough to have memorized my favorite recipe. It makes a good size ball and stores neatly in anything with a tight lid that can hold two cups.

boil boil

If you do this with little people, make sure you trust them with the stove. The stove is not on in this picture.

Our Best Play Dough
Dump the following into a sauce pan and mix well:

1 c. all purpose flour
1 c. water
1/4 c. salt (table, no need to be fancy)
1 T. oil
2 T. cream of tartar
food coloring to suit taste

Put your pan over medium heat. The goop will look nice and smooth like this…

smooth goop

…if you’ve used neon green food coloring.

Start stirring. Right about the time you think your arm will fall off (5-10 minutes), this will happen:

lumped up

It will start to pull away from the sides of the pan and clump together.

Keep cooking and stirring until the mess has barely stopped being shiny and then pull it off of the heat. I also dump it out of the pot so it will stop cooking and not get too hard. Give it a few minutes to rest. When it’s cool enough to touch, knead the play dough until it’s smooth. I find that kneading is easier while it is still warm.

Wash your pot and repeat until you’ve run out of colors or storage boxes. Or in our case, both.

pisa

All this took us less than an hour to mix up.

In an airtight container, it keeps far longer than you’d think. We’ll be playing with this batch well into March. Unless it all gets mixed into a muddy rainbow. Then we’ll have to make more.

squidgy

Upcycle

The Miracle Household is blessed with an overabundance of t-shirts. When I can no longer close Michael’s shirt drawer, he weeds out the ones he doesn’t wear and sorts them into two piles: dust rags and memorabilia. As an individual who neglects house work with such natural ability (I’m thinking of turning pro), I only need so many dust cloths.

So what do I do?

What any knitter would do: make yarn.

wound yarn

It’s actually not that hard.

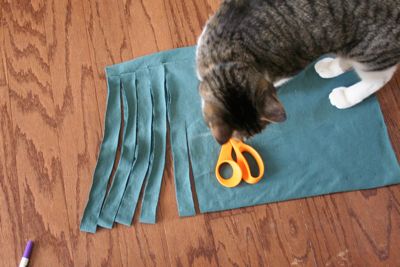
First, find yourself some t-shirts. Qualifications: no side seams, minimal decoration. Stitching and ink will keep the jersey from doing the curling trick. You’ll need a ruler, scissors and one of those disappearing ink fabric markers (in a pinch, and if you don’t care about permanence, ball point pen also works).

cat in the shirts

Cat is optional.

Cut the bottom of a t-shirt straight across under the arm holes (or under the printing) and slice off the bottom hem. You now have a loop of fabric with two raw edges. (You also have a cropped shirt that would have been awesome in the 80s and a way to restrain prisoners. But for knitting purposes, you only need the loop.)

Flatten the loop into a rectangle as best you can, smoothing out the wrinkles, and arrange it with the raw edges to the left and right. Fold the loop in half so that the bottom edge rests about an inch beneath the top edge.

fold over

This is so you don’t have to try and cut straight for two feet.

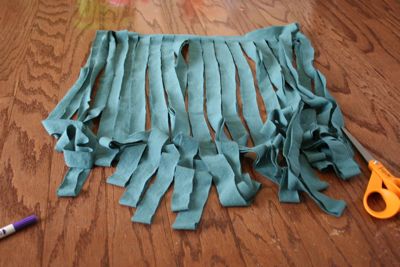
Now, you don’t have to get out the T-square and go all crazy precise with this next part, just be as neat as you can. Using the ruler and fabric pen, make marks one inch apart along the bottom edge and then along the edge that used to be the bottom edge.

tick marks

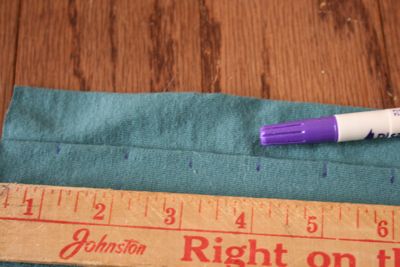
Any width is fine, but don’t try smaller than 1/2inch: it breaks.

Get your scissors and cut strips from bottom mark to top mark. Be careful to clip through the marked top edge, but not all the way through the inch of buffer at the top of the fabric. The object is to make one continuous strip of t-shirt – not a bunch of loops.

upcyclecut

William Henry, mind your own business!

When you’re finished, it folds out into a hula skirt.

upcyclehula

Which gives me another idea for another time.

Now comes the trickiest part.

Open it all out so that you can isolate the inch margin where the strips are still hooked together. You want to make sure not to cut anything but the margin in this next step. Make diagonal cuts from one strip to the next.

upcyclesnip

Once you get the first one made, the rest are easy.

Then you’ve got a big spaghetti mess that needs to be wound into a ball. As you’re winding, give the strip a nice stretch. It’ll do it’s jersey trick and curl right up.

upcyclewind

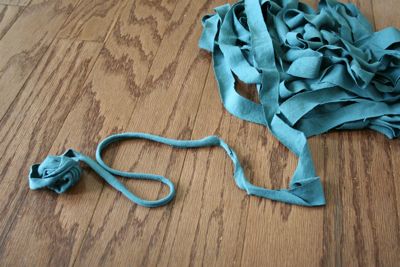
Jersey is just tiny tiny stockinette after all.

And you’ve got yarn! With 1″ cuts, I got about 26 yards from each large and extra large shirt.

Slice up a pile of white tees and you could make a garter stitch bath mat. Or if you have a bunch of colors, why not try a log cabin rug (Mason Dixon Knitting style). I made a toy, of course.

upcyclefrog

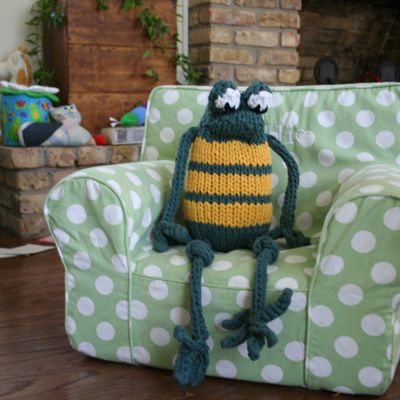
I’m a one trick pony these days.

I’ll never knit a t-shirt toy again. Knitting this stuff in a gauge small enough to conceal stuffing was rough on my wrists. This frog is one of a kind.

Next Earth Day, I’ll make a bath mat.

*Note: Cutting t-shirts into yarn isn’t my original idea by any stretch of the imagination. I’m sure there are a ton of tutorials out there much better than mine. If you find yourself saying “Whaaaa?” about my instructions, Google!

Snacks

A couple people asked to see Ellie’s felt tea bags.

tea bags

Sewn up on the machine with ribbon strings and pinked edges.

backlit tea bag

I put dark brown in the middle so it looks like there is tea inside.

I went ahead and took a few more pictures of my favorites while I had the camera out – a lot of her Teeth Prizes have been play food.

eggs!

I didn’t “make” these, just painted them. Ellie loves to count them.

fixins

Sandwich fixins. The sack in the back has potato chips.

bowties

One of the first things I tried.

tortilla

I’m proud of the tortillas – I put aluminum foil inside to keep them folded!

Now I’m kind of hungry.

Handmade Holiday

In December (as you know), knitting takes a back seat to lots and lots and lots of other craftiness.

Ellie, Betty and I made wrapping paper while wearing pajamas (we were getting over our second wretched cold).

chickenwrappingpaper

The vacuum in the background represents my good intentions.

We also made our Annual Limited Edition Christmas Ornaments.

chickenornaments

Mamie was a big help.

When Ellie wasn’t looking, I made a family for the dollhouse she is getting for Christmas.

chickenfamily

Daddy, Mommy, Ellie and six cats.*

And, while it sometimes takes a back seat, there is always always knitting.

chickenlegs

A rooster for the shop and one for a customer.

Speaking of the shop, I did 90% of our Christmas shopping through Etsy this year. Ivey Christmas 2009 has been sponsored by my own shop and my brilliant customers. Because of this, I have developed a certain compulsion to stimulate individual economies. Each handmade Christmas present is not only a unique gift, but it has put a little more jingle in someone else’s pocket and a little more happy in their New Year.

For that, I am awarding myself 10 Do-Gooder Bonus Points.
Current Standings:
Christmas – 15, Emily – 15, Cats – 2 (for helping)

*Ted went to his Forever Home the week after Thanksgiving. His new family is a retired couple who is happy to make him the Center of Attention. Which is the only thing Ted ever wanted.